Want to experiment with a new hair color without the commitment or hefty price tag? Kool-Aid hair dye is a surprisingly effective and fun way to temporarily transform your tresses!
The journey began rather simply, a quest for a temporary splash of color that wouldn't break the bank. This involved gathering the essential kool aid hair dying supplies. The allure of vibrant hues, achieved with a childhood favorite drink mix, was too tempting to resist. We were skeptical, naturally, but also intrigued. The promise of a temporary, affordable, and relatively harmless hair color change seemed too good to be true. Armed with packets of Kool-Aid in various enticing flavors, we embarked on an experiment that would either result in dazzlingly colorful hair or a sticky, sugary mess. Heres how it happened
| Aspect | Details |
|---|---|
| Method Name | Kool-Aid Hair Dye |
| Principle | Temporary hair coloring using Kool-Aid drink mix. |
| Cost | Extremely affordable (around $1 per application) |
| Longevity | Temporary; lasts for a few washes (typically 1-4 washes) |
| Hair Types | Works best on light blonde, lighter brown, or pre-lightened hair; results vary on darker hair. |
| Color Options | Vast range of colors achievable by using single flavors or mixing different Kool-Aid flavors. |
| Application | Dip-dyeing, painting sections, or applying all over. |
| Ingredients | Unsweetened Kool-Aid powder, water (hot), conditioner (optional) |
| Safety | Relatively safe for hair and skin; however, staining can occur. |
| Messiness | Can be messy; requires careful application and cleanup. |
| Suitability for Dark Hair | Colors may not show up vibrantly; darker, more concentrated flavors recommended. |
| Popular Colors | Berry Blue, Cherry, Grape, Tropical Punch. |
| Mixing Colors | Strawberry + Grape = Purplish Red |
| Cherry = Deeper Red | |
| Tropical Punch = Brighter Red | |
| Alternative Uses | Can be used to dye dog hair (choose safe, non-toxic options). |
| Important Note | Results can vary; pre-lightening hair enhances vibrancy. |
| Reference Link | Example Kool-Aid Hair Dye Guide |
The first step involves selecting the right Kool-Aid flavors. Choose unsweetened versions in your favorite colors. This is crucial, as the sugar content in sweetened versions can make the application process unnecessarily sticky. The unsweetened powder allows for a cleaner, more controlled color deposit. Think about the shades you desire vibrant blues, fiery reds, or maybe even a playful mix of colors. The beauty of this method lies in its customizability. You are the artist, and your hair is the canvas.
- Nathan Berhow The High School Shooting More Shocking Details
- Olivia Peters Tragedy Lawsuit And Remembered Life
One concern that often arises is the smell. Kool-Aid has a distinct aroma, which can be quite potent during the dyeing process. However, if you dont like this smell, it will disappear after rinsing. The scent is temporary and fades quickly once the hair is washed, leaving behind only the desired color. So, breathe easy, the fruity fragrance won't linger for long.
Before diving in, it's essential to address safety. To sum up, the item is relatively harmless for your mouth and hair. Kool-Aid is essentially food-grade dye, making it a gentler alternative to harsh chemical dyes. However, as with any cosmetic application, it's always wise to perform a patch test first, especially if you have sensitive skin. Apply a small amount of the Kool-Aid mixture to a discreet area of your skin and wait 24 hours to check for any adverse reactions. This precaution ensures a safe and enjoyable coloring experience.
For inspiration, consult a kool aid hair dye color chart. These charts provide a visual guide to the spectrum of colors achievable with different Kool-Aid flavors. They also offer valuable insights into how different flavors interact when mixed, opening up a world of creative possibilities. If you're feeling adventurous, or you can mix colors to create new and unique shades. The combinations are endless, allowing you to tailor the color perfectly to your personal style.
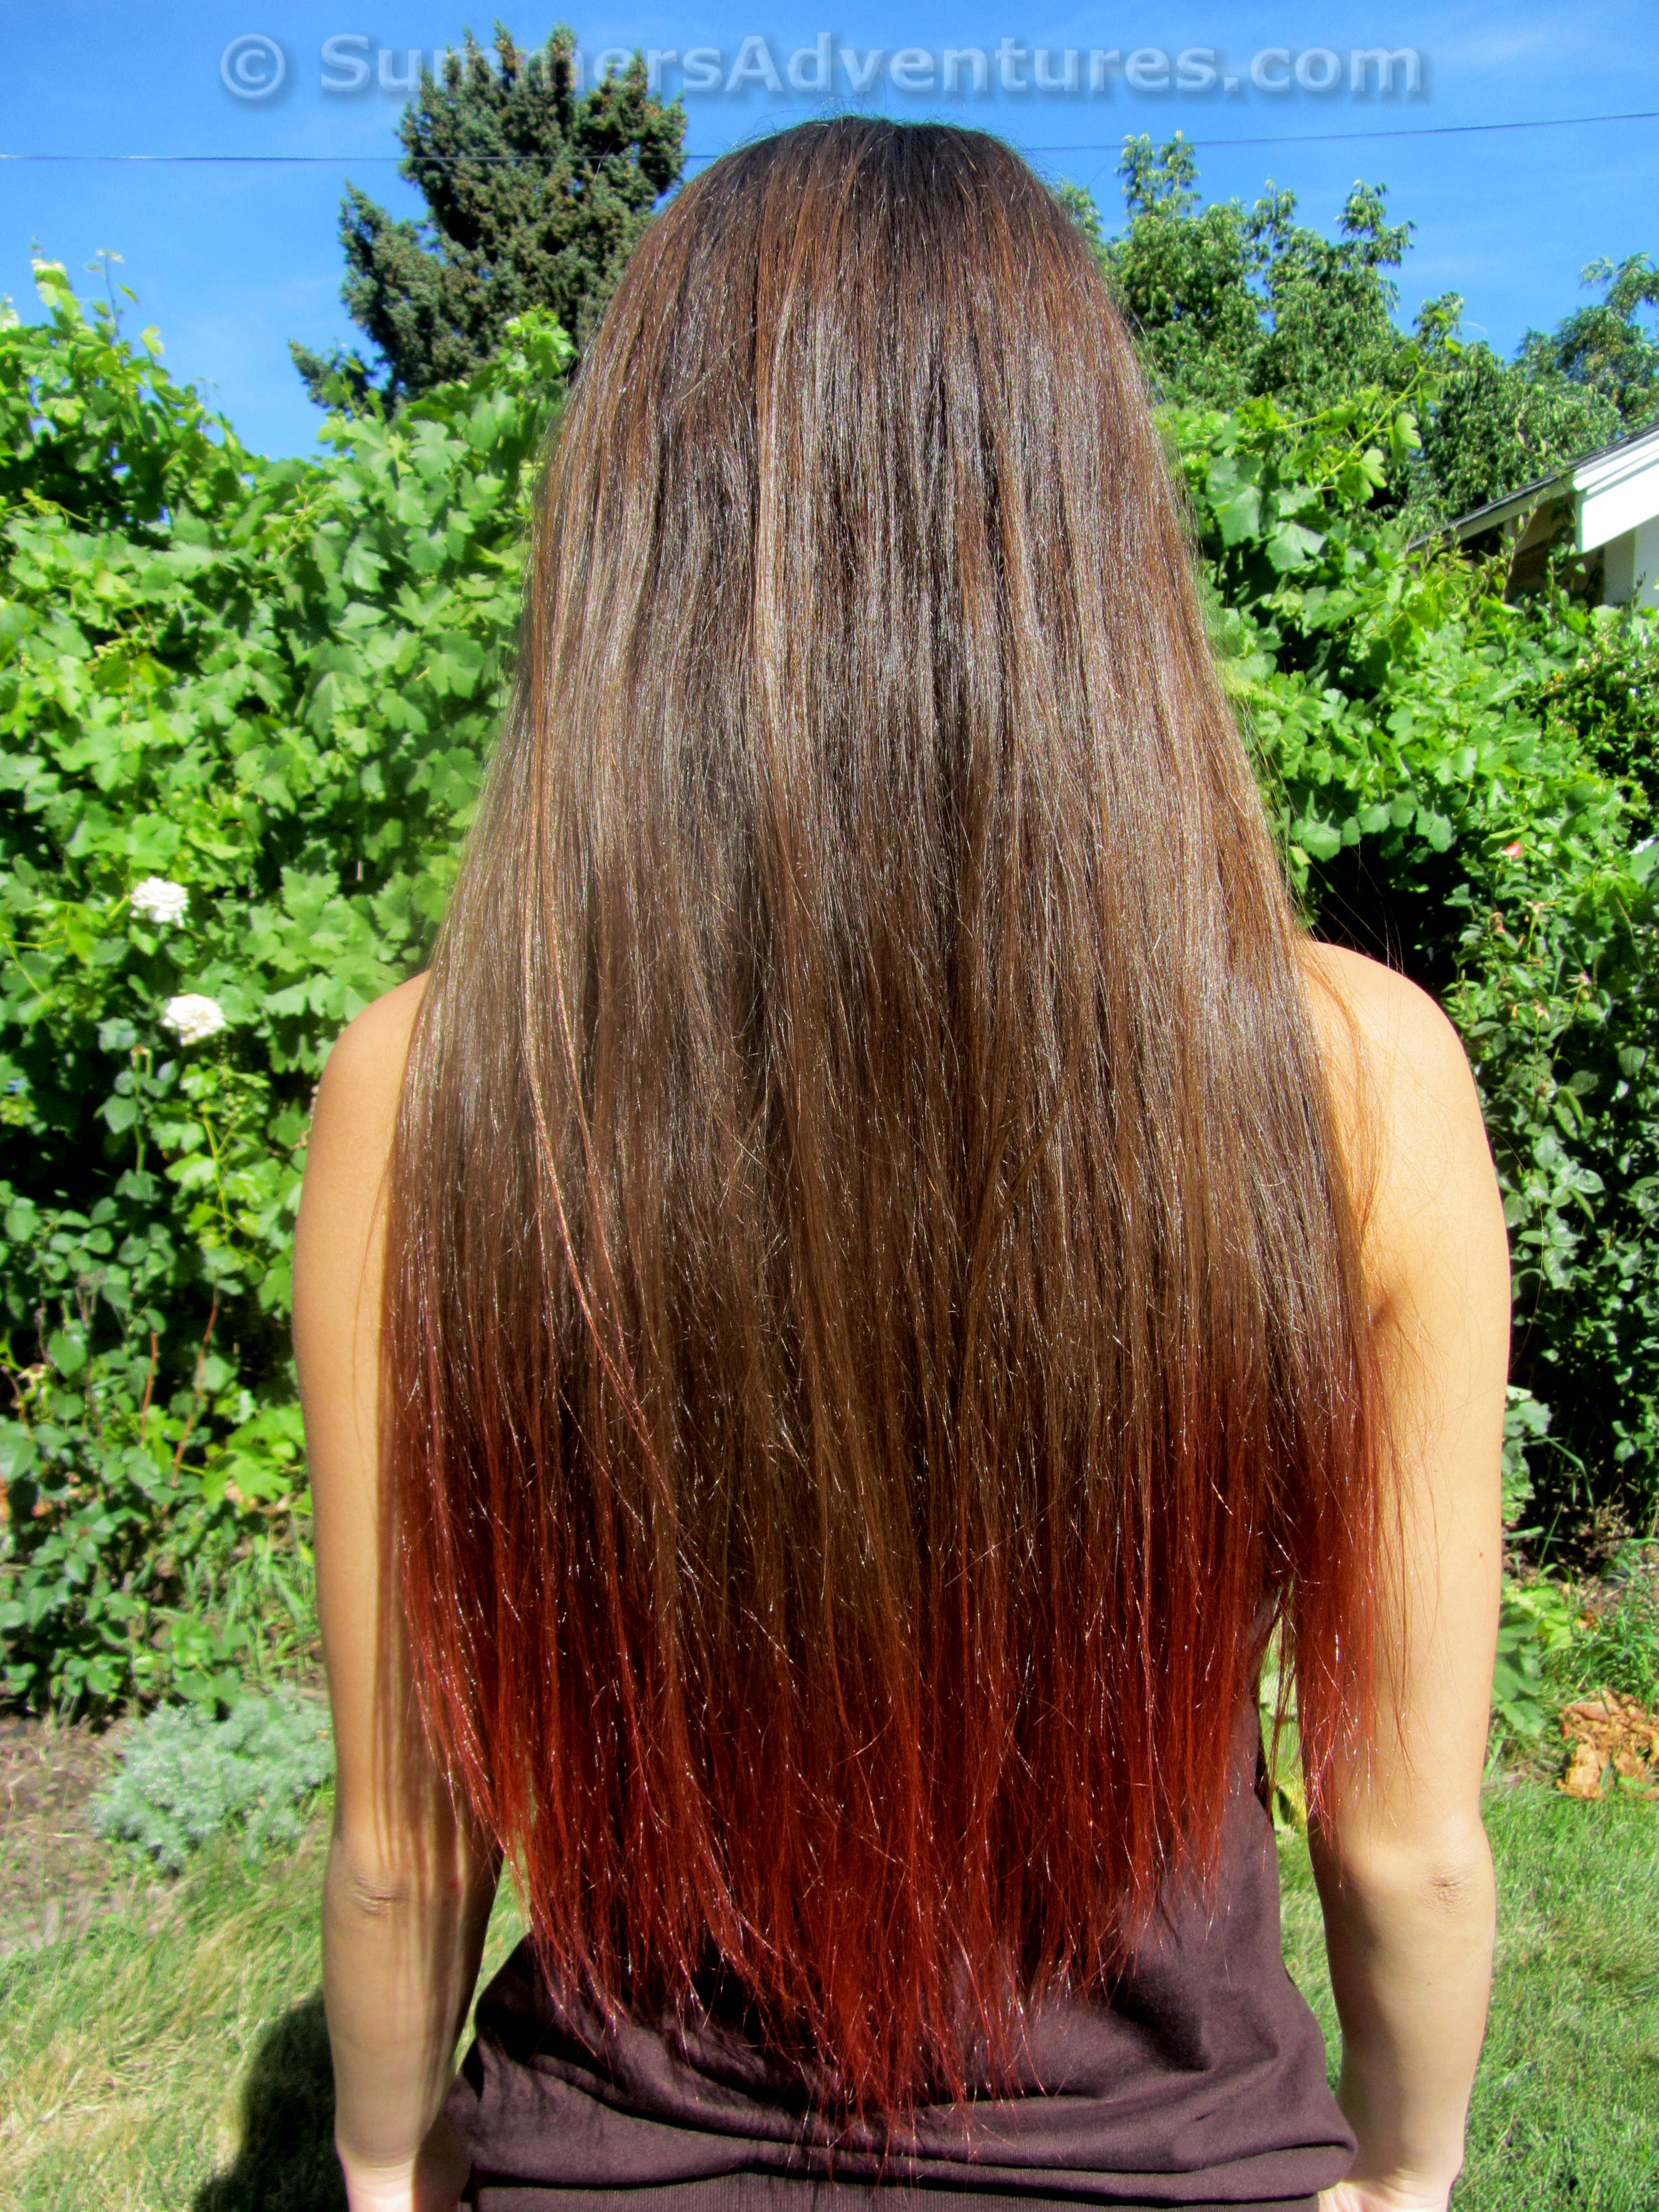
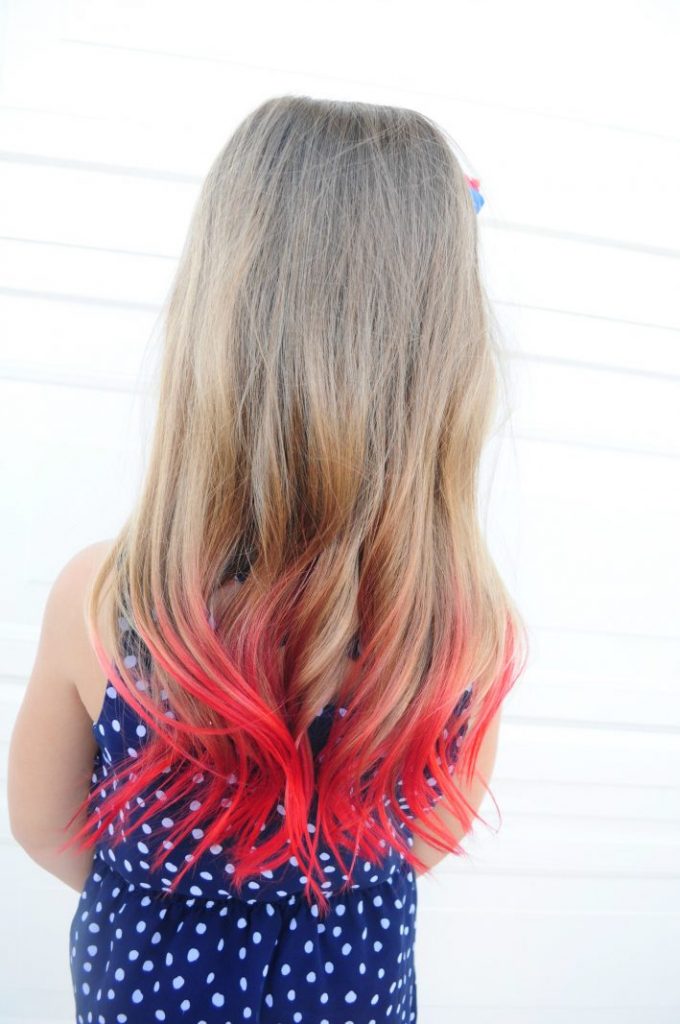
There are various application techniques to explore. This chosen method is generally used to dye the tips of the hair instead of coloring the entire head. This "dip-dye" technique is perfect for adding a pop of color to the ends of your hair without committing to a full head of vibrant hues. It's a low-maintenance and trendy way to experiment with different shades.
For a more comprehensive color transformation, consider applying the Kool-Aid mixture to larger sections of your hair. Brush it on, working from the roots to the tips, until the whole section is covered. This method requires a bit more time and precision but results in a more dramatic and noticeable color change. Using a tint brush, typically used for salon hair dye applications, ensures even distribution and prevents blotchy results.
Keep in mind that certain colors tend to last longer than others. Dark blue may last longer as it can fade into greener shades. This is due to the pigment composition of the blue dye, which contains green undertones. While this can be a desirable effect for some, it's something to be aware of when choosing your Kool-Aid flavors. If you're aiming for a temporary burst of blue, be prepared for the possibility of a gradual shift towards a greenish hue.
The effectiveness of Kool-Aid hair dye varies depending on hair type and color. It works on all types of hair, but with varying results. Lighter hair colors, such as blonde or light brown, will absorb the dye more readily, resulting in more vibrant and noticeable results. Darker hair colors, on the other hand, may require pre-lightening to achieve the desired level of vibrancy. Consider your natural hair color and adjust your expectations accordingly.
The key to successful Kool-Aid hair dyeing is experimentation. You can experiment with different methods and flavor combinations to find what works best for your hair. Don't be afraid to try different application techniques, mixing ratios, and development times to achieve your desired results. The process is all about having fun and discovering the unique possibilities that Kool-Aid hair dye offers.
Before you begin, be prepared for potential messiness. For starters, it can get messy. The Kool-Aid mixture can easily splatter and stain surfaces, so it's essential to take precautions to protect your surroundings. Cover your work area with old towels or newspapers, wear gloves to prevent staining your hands, and be mindful of your clothing. With a little preparation and caution, you can minimize the mess and enjoy a stress-free dyeing experience.
One popular technique is the dip dying method. This kool aid hair dye method, called dip dying, involved mixing the kool aid with hot water and letting the ends of the hair sit in the mixture until colored. The hot water helps to activate the dye and allows it to penetrate the hair shaft more effectively. Monitor the color development closely and remove your hair from the mixture once you've achieved the desired intensity. This method is perfect for creating a trendy and low-maintenance dip-dyed look.
During one particular experiment, we followed the instructions to the letter, and to our surprise, it worked amazingly well! The colors were vibrant, the application was relatively easy, and the results were surprisingly long-lasting. The success of this venture solidified our belief in the potential of Kool-Aid as a viable hair dye alternative. It's a testament to the fact that sometimes, the most unexpected solutions can yield the most impressive results.
One of the biggest advantages of using Kool-Aid as hair dye is its affordability. Dye your hair for only $1.00 worth of kool aid packets! This makes it an incredibly budget-friendly option for anyone looking to experiment with temporary hair color. Compared to salon treatments or even over-the-counter hair dyes, Kool-Aid offers a significantly cheaper alternative without sacrificing the fun and creativity of the process.
If you're eager to try this method yourself, find out what you need in order to do it yourself in this tutorial. This step-by-step guide provides all the information you need to successfully dye your hair with Kool-Aid, from gathering the necessary supplies to mastering the application techniques. With clear instructions and helpful tips, you'll be well on your way to achieving vibrant and colorful locks in no time.
And the best part? Watch to the end to see how easy the whole process is. The simplicity of Kool-Aid hair dyeing is one of its most appealing qualities. With minimal effort and readily available ingredients, you can transform your hair in a matter of minutes. The quick and easy application makes it a perfect option for spontaneous color changes or last-minute style transformations.
To enhance the dyeing process, consider adding a dollop of conditioner. Add a blob of conditioner. This helps to dilute the Kool-Aid mixture, making it easier to apply and distribute evenly. It also adds a moisturizing element to the process, preventing the hair from becoming dry or brittle. The conditioner acts as a buffer, protecting the hair while allowing the dye to penetrate effectively.
When it comes to measuring the ingredients, precision isn't always necessary. I didnt actually measure it, but i dont think it really matters exactly how much. The beauty of Kool-Aid hair dyeing is its forgiving nature. A little more or less water or conditioner won't drastically alter the results. Feel free to adjust the ratios to your liking, based on your hair type and desired color intensity.
For a visual reference, you can see how much i used in the image below. Observing the consistency and quantity of the mixture can provide valuable insights into the ideal proportions. Use the image as a guide, but don't be afraid to experiment and adjust the ratios to suit your individual needs and preferences.
While Kool-Aid hair dye charts are helpful, they may not always include every possible color combination. This kool aid hair dye chart seems to give some good color combo ideas but unfortunately didnt have a purple option. Don't let this limitation discourage you from exploring your creativity. The possibilities are endless, and with a little experimentation, you can create a custom purple shade that perfectly complements your style.
To spark your imagination, you might like some of these color ideas. Consider these suggestions as a starting point, and feel free to adapt and modify them to create your own unique blends. The world of Kool-Aid hair dye is a playground of color, waiting to be explored.
For instance, mixing strawberry and grape can make a purplish red; This combination creates a rich and vibrant shade that combines the warmth of red with the coolness of purple. It's a perfect option for those seeking a bold and eye-catching color.
Cherry can produce deeper red; This flavor yields a classic and timeless red shade that is sure to turn heads. It's a versatile option that can be adapted to suit a variety of skin tones and hair types.
Tropical punch can give a brighter red; This flavor offers a more playful and vibrant red hue, perfect for those seeking a fun and energetic look. It's a great choice for summer or for adding a pop of color to your everyday style.
The same principles apply if you want to experiment on your furry friends, but with extra caution. Decide which color you want your dogs hair to turn out and purchase some kool aid powder packets in the same shade. However, always prioritize your pet's safety and well-being. Choose Kool-Aid flavors that are free of artificial sweeteners and potentially harmful ingredients. Consult with your veterinarian before dyeing your dog's hair to ensure it's safe for their specific breed and health condition.
When selecting Kool-Aid flavors, there are a variety of colors to choose from, but the best options are purple (grape), blue (berry blue), red (cherry or tropical punch), green (kiwi lime), yellow (lemon lime), or orange (orange). These flavors tend to produce the most vibrant and noticeable results, especially on lighter hair colors. However, don't be afraid to experiment with other flavors to create unique and unexpected shades.
It's important to consider your hair color when choosing a dyeing method. How to apply kool aid to black hair requires a slightly different approach than applying it to lighter hair. Due to the darker pigment of black hair, the Kool-Aid color may not show up as vibrantly. Pre-lightening the hair is often necessary to achieve noticeable results.
Despite its temporary nature, Kool aid is a great way to dye hair without doing anything permanent. It's a commitment-free way to experiment with different colors and styles without damaging your hair. This makes it a perfect option for those who are hesitant to commit to permanent hair dye or who simply enjoy changing their look frequently.
Compared to other temporary hair coloring options, it's cheap, lasts longer than hair chalk, and isn't as chunky as coloured hair spray. Kool-Aid offers a unique combination of affordability, longevity, and ease of use. It's a versatile option that caters to a wide range of needs and preferences.
However, it's important to note that the results won't be as bright or vibrant on black hair, and the original colour will show through. This is simply due to the darker pigment of the hair, which can mask the color of the Kool-Aid dye. However, with proper preparation and the right color choices, you can still achieve beautiful and noticeable results on dark hair.
To begin the dyeing process, start with one packet and a couple of tablespoons of water. This ratio provides a concentrated mixture that will effectively deposit color onto the hair. Adjust the amount of water depending on the desired consistency and intensity of the color.
For optimal results, optimal results are often achieved with darker, more concentrated flavors like berry blue, cherry, and grape. These flavors contain a higher concentration of pigment, which allows them to penetrate the hair shaft more effectively and produce more vibrant results. If you're looking for a bold and noticeable color change, opt for these darker flavors.
Here's a step-by-step guide to dyeing your hair with Kool-Aid: To dye your hair, start by mixing 4 packets of kool aid with enough conditioner to cover your hair. The conditioner helps to dilute the Kool-Aid, making it easier to apply and distribute evenly. It also adds a moisturizing element to the process, preventing the hair from becoming dry or brittle.
Next, apply the mixture to your hair, starting from your roots and working down to your tips. This ensures that the entire strand of hair is coated with the dye, resulting in even and consistent color distribution. Use a tint brush or your gloved hands to apply the mixture carefully and thoroughly.
To make it easier, divide your hair into sections first. This will help you to manage your hair more effectively and ensure that every strand is evenly coated with the Kool-Aid mixture. Use hair clips or ties to separate the sections and work systematically through your entire head of hair.
During one particular experiment, we used 3 packs each time and they cost $.30 each. This illustrates the affordability of Kool-Aid hair dyeing. For less than a dollar, you can achieve a temporary and vibrant color change. This makes it an incredibly budget-friendly option for anyone looking to experiment with different hair colors.
Once we were done dipping the hair in the dye, i blotted with a rag or thick paper towel, and dried with a hair dryer. Blotting the hair helps to remove excess dye and prevent dripping. Drying the hair with a hair dryer helps to set the color and speed up the process. Be careful not to overheat the hair, as this can damage it.
After the dyeing process, the girls either put their hair up for a little bit, or took a shower right away. Putting the hair up allows the color to set further, while taking a shower helps to remove any excess dye. Choose the method that works best for your hair type and desired results.
Now that you have your ingredients, lets get to the nuts and bolts. It's time to assemble your supplies and prepare for the dyeing process. Gather your Kool-Aid packets, water, conditioner, gloves, towels, and any other necessary items. Having everything ready and within reach will make the process smoother and more efficient.
Before applying the Kool-Aid mixture, make sure your hair is completely dry, brushed, and in a low ponytail. This ensures that the dye will adhere properly to the hair and prevent tangling or uneven color distribution. A low ponytail will also help to keep the hair out of your face and prevent staining.
Despite careful application, the blue did not turn out at all, even though standard hair color has. This highlights the unpredictable nature of Kool-Aid hair dyeing. Sometimes, certain colors may not take as well as others, depending on the hair type and the concentration of pigment in the Kool-Aid. Don't be discouraged if your first attempt isn't perfect. Experiment with different flavors and techniques until you achieve your desired results.
One adventurous individual even dyed my hair with kool aid by leaving it in for 24 hours! This extreme method demonstrates the versatility of Kool-Aid hair dyeing. Leaving the dye in for an extended period can result in more intense and long-lasting color. However, proceed with caution and monitor your hair closely to prevent damage.
Sometimes, things don't go as planned. This day did not go as expected! It's important to remember that Kool-Aid hair dyeing is an experiment, and not every attempt will be successful. Be prepared for unexpected results and learn from your mistakes. The process is all about having fun and embracing the creative possibilities.
subscribe here:
- True Crime Women Murder Shocking Cases And Motivations
- Yeehaw Pink Rodeo 1st Birthday Party Decorations More